I was thinking of purchasing one of these awhile back however by pure chance I happened to come upon one for free. So for anyone wondering just what these things are (as I once did) here's an update.
LED BELT BUCKLE
The picture above is of the faceplate (the part everyone is going to see when you wear it). The rough dimensions are 13.5cm x 4.7 cm x 0.5cm not including the little buckle off to the right or the extensions on the back due to the batteries.
The device requires 2 CR2032 Batteries (the big skinny ones you find in calculators or motherboards) however I accidentally bought the 2025's, however it still works fine.
Mass of device + 2 batteries =
The device is programmable and when I first turned it on I found (to my dismay) scrolling hearts appear on the screen. A video of this can be found here:
LED BELT BUCKLE VIDEO LINK
On the back of the device is the circuit board with the battery inserts and the controls (this part is not fancy because technically no one sees it). There are 3 buttons and two battery inserts as shown below.
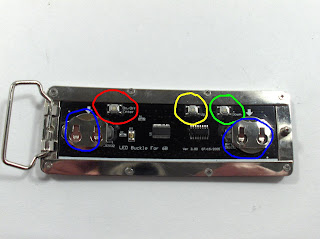
On the circuit board it says that the buckle can store 6B of data. Once the device is turned on you press the "Down" button once to enter the settings mode. There are several settings you can explore and change:
1. Select - This option allows you to choose between 1 of the 8 stored messages (thats right, the device can store not 1, but 8 individual messages).
2. Input - This option allows you to change any of the 8 stored messages, the device comes programmed with the entire alphabet, numbers 0-9, and several misc. symbols. You simply press the "Up" or "Down" buttons to scroll through your choices, when you are satisfied with a certain character you hold down the "Enter" button and then press the "Up" button to move onto the next character.
3. Speed - This option allows you to choose the speed of the scrolling characters across the screen, there are 8 different speeds with 8 being the fastest and 1 the slowest.
4. Left - This option causes the displayed message to scroll from right to left.
5. Right - This option causes the displayed message to scroll from left to right.
6. Up - This option causes the displayed message to scroll from bottom to top.
7. Down - This option causes the displayed message to scroll from top to bottom.
8. Freeze - This option causes the displayed message to freeze at a specific spot and not move.
9. Flash - This option causes the displayed message to flash as it moves across the screen.
10. Loop - This options causes the device to display all 8 messages one after the other and then repeat.
Last but not least, the device has 3 brightness options that you must scroll through to turn the device off. Once the device is turned on, the "high" setting of brightness is selected by default, by pressing "Off" once, the brightness is decreased to "medium", by pressing "Off" yet again the brightness is reduced to "low" and finally by pressing "Off" again, the device is turned off.
Conclusion: For roughly $30 US this device packs in more than I expected. I am quite impressed by the degree of control one is given over the settings, allowing the user to customize to their needs. Definitely a "must-have" if you want to impress the ladies and be a geek at the same time.
Thursday, June 7, 2007
Sunday, June 3, 2007
5 minute rocket
So one Sunday morning an engineering friend of mine was going to launch his rocket-camera however he decided not to. In light of the situation (beautiful weather and a feeling of rocket-fever) I decided to quickly build a rocket to launch.
Components:
- 1 high density cardboard tube (roughly 2.5cm in diameter)
- 1 standard plastic nosecone (taken from a previous rocket kit)
- 1 Estes D12-3 engine
- some balsa wood
- some glue
- some electrical tape
- an old battery
Note: for all of you that are not familiar with rocket engine classifications, D is the most powerful engine you are legally allowed to purchase.
If you are still interested I have written a full rocket engine classification report. Refresh yourself or learn for the first time just how rocket engines work and what all the letters and numbers mean in their classifications.
Check it out here: Rocket Engine Report
back to the project! So with these materials I literally built the rocket in 5 minutes flat (excluding time for the glue to dry).
Here's how:
1. Engine fit perfectly into cardboard tube (snug fit).
2. Punch a toothpick through the cardboard tube just above the end of the engine to keep the engine in place (instead of shooting up through the tube during launch).
3. Tape old battery into the inside of the nosecone (its hollow) to add weight to the front of the rocket. This is for stability reasons, you can read my full report on this here:
CG and CP in Rocket Stability
4. Nosecone fit perfectly into cardboard tube (snug fit).
5. Tape around the nosecone to secure it to cardboard tube (use electrical tape).
6. Cut out some(4) fins (larger is better for stability reasons, but within reason) out of balsa wood, trying to keep them the same shape and size.
7. Glue the fins onto the bottom of the rocket.
Now just wait for the glue to dry and you have a perfect 5-minute rocket!
Come launch time I decided to quickly spray paint the whole thing bright red (for visibility purposes). We launched this rocket a total of 3 times before we lost it and each launch it went several hundred meters straight up, it also ended up coming down hard because of the lack of a parachute. The first two launches we launched it straight up and you can see a video of the first launch here:
Rocket Launch #1
For the third (and last) launch we decided to angle the rocket at roughly 45 degrees to maximize the distance traveled. The rocket ended up flying across two large fields and into a construction zone. Bye bye rocket.
For anyone bored enough on a Sunday morning and in possession of the above materials I strongly suggest trying to build this 5 minute rocket and trying it out for yourselves! You wont be disappointed in terms of performance.
Subscribe to:
Posts (Atom)