I was thinking of purchasing one of these awhile back however by pure chance I happened to come upon one for free. So for anyone wondering just what these things are (as I once did) here's an update.
LED BELT BUCKLE
The picture above is of the faceplate (the part everyone is going to see when you wear it). The rough dimensions are 13.5cm x 4.7 cm x 0.5cm not including the little buckle off to the right or the extensions on the back due to the batteries.
The device requires 2 CR2032 Batteries (the big skinny ones you find in calculators or motherboards) however I accidentally bought the 2025's, however it still works fine.
Mass of device + 2 batteries =
The device is programmable and when I first turned it on I found (to my dismay) scrolling hearts appear on the screen. A video of this can be found here:
LED BELT BUCKLE VIDEO LINK
On the back of the device is the circuit board with the battery inserts and the controls (this part is not fancy because technically no one sees it). There are 3 buttons and two battery inserts as shown below.
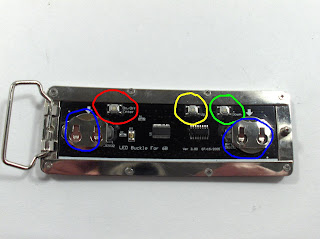
On the circuit board it says that the buckle can store 6B of data. Once the device is turned on you press the "Down" button once to enter the settings mode. There are several settings you can explore and change:
1. Select - This option allows you to choose between 1 of the 8 stored messages (thats right, the device can store not 1, but 8 individual messages).
2. Input - This option allows you to change any of the 8 stored messages, the device comes programmed with the entire alphabet, numbers 0-9, and several misc. symbols. You simply press the "Up" or "Down" buttons to scroll through your choices, when you are satisfied with a certain character you hold down the "Enter" button and then press the "Up" button to move onto the next character.
3. Speed - This option allows you to choose the speed of the scrolling characters across the screen, there are 8 different speeds with 8 being the fastest and 1 the slowest.
4. Left - This option causes the displayed message to scroll from right to left.
5. Right - This option causes the displayed message to scroll from left to right.
6. Up - This option causes the displayed message to scroll from bottom to top.
7. Down - This option causes the displayed message to scroll from top to bottom.
8. Freeze - This option causes the displayed message to freeze at a specific spot and not move.
9. Flash - This option causes the displayed message to flash as it moves across the screen.
10. Loop - This options causes the device to display all 8 messages one after the other and then repeat.
Last but not least, the device has 3 brightness options that you must scroll through to turn the device off. Once the device is turned on, the "high" setting of brightness is selected by default, by pressing "Off" once, the brightness is decreased to "medium", by pressing "Off" yet again the brightness is reduced to "low" and finally by pressing "Off" again, the device is turned off.
Conclusion: For roughly $30 US this device packs in more than I expected. I am quite impressed by the degree of control one is given over the settings, allowing the user to customize to their needs. Definitely a "must-have" if you want to impress the ladies and be a geek at the same time.
Thursday, June 7, 2007
Sunday, June 3, 2007
5 minute rocket
So one Sunday morning an engineering friend of mine was going to launch his rocket-camera however he decided not to. In light of the situation (beautiful weather and a feeling of rocket-fever) I decided to quickly build a rocket to launch.
Components:
- 1 high density cardboard tube (roughly 2.5cm in diameter)
- 1 standard plastic nosecone (taken from a previous rocket kit)
- 1 Estes D12-3 engine
- some balsa wood
- some glue
- some electrical tape
- an old battery
Note: for all of you that are not familiar with rocket engine classifications, D is the most powerful engine you are legally allowed to purchase.
If you are still interested I have written a full rocket engine classification report. Refresh yourself or learn for the first time just how rocket engines work and what all the letters and numbers mean in their classifications.
Check it out here: Rocket Engine Report
back to the project! So with these materials I literally built the rocket in 5 minutes flat (excluding time for the glue to dry).
Here's how:
1. Engine fit perfectly into cardboard tube (snug fit).
2. Punch a toothpick through the cardboard tube just above the end of the engine to keep the engine in place (instead of shooting up through the tube during launch).
3. Tape old battery into the inside of the nosecone (its hollow) to add weight to the front of the rocket. This is for stability reasons, you can read my full report on this here:
CG and CP in Rocket Stability
4. Nosecone fit perfectly into cardboard tube (snug fit).
5. Tape around the nosecone to secure it to cardboard tube (use electrical tape).
6. Cut out some(4) fins (larger is better for stability reasons, but within reason) out of balsa wood, trying to keep them the same shape and size.
7. Glue the fins onto the bottom of the rocket.
Now just wait for the glue to dry and you have a perfect 5-minute rocket!
Come launch time I decided to quickly spray paint the whole thing bright red (for visibility purposes). We launched this rocket a total of 3 times before we lost it and each launch it went several hundred meters straight up, it also ended up coming down hard because of the lack of a parachute. The first two launches we launched it straight up and you can see a video of the first launch here:
Rocket Launch #1
For the third (and last) launch we decided to angle the rocket at roughly 45 degrees to maximize the distance traveled. The rocket ended up flying across two large fields and into a construction zone. Bye bye rocket.
For anyone bored enough on a Sunday morning and in possession of the above materials I strongly suggest trying to build this 5 minute rocket and trying it out for yourselves! You wont be disappointed in terms of performance.
Monday, May 21, 2007
Robot Android Version 1.0
One day in the summer of the tenth grade I finally just got tired of human beings and decided that the logical course of action would be to BUILD a robot that would possess all the attributes and qualities I wanted and that would lack all those humans seemed to have an abundance of (the ones that were getting on my nerves). Unfortunately I was quite young at the time (tenth grade, give me a break) and I was flat broke. Aluminum sheets and tubes for the body, high quality ball joints for the connections, a spare computer for the brain? unfortunately not. I was stuck with a pile of wood, a hand saw, some electrical tape, PVC pipes, a sheet of thin foam (from a camping set) and my primitive imagination. So, I did what any engineer would do in the situation, first cry a little about my misgivings, then improvise until the original dream of a walking/talking/super-human android was finally twisted and distorted by so many shortcuts that the final product was something entirely different.
So, with the materials listed and a hefty supply of super strength wood glue I constructed what you see below, my robot android (version 1.0).
Structural Components:
Abdomen:
The core of the lower half of the robot. This piece joins the legs to the rest of the body and has to allow the legs to remain solid and stable while being able to rotate. Futhermore it has to be able to withstand the most force due to its position in the body.
I was aiming to imitate a rough shape of the human abdomen, hence I avoided the perfect square at ALL COSTS. However, cutting wood accurately with a hand saw (and making replica's for two sides) is quite hard and so I ended up producing something more angular than what I wanted, but it worked nicely as you can see. All the wood pieces were attached with wood glue. In total the abdomen consists of 4 major wooden sections.
To connect the abdomen to the two legs I used PVC pipes. Attaching these pipes so that they were 100% secured to my liking was difficult. I ended up making two holes in the sides of the abdomen (the wooden sheets), sliding the PVC pipe through and gluing some AOL CD's (good for anything but installing on your computer) to them, finally I added an extra layer of wood around the pipe on the external sides. This produced such a secure connection that I was thoroughly impressed and I recommend this technique to anyone in need of a quick fix and in a similar situation.
LEGS:
The leg design is broken into 3 main components. The hips or thighs that connects the legs to the abdomen, the leg shafts consisting of the knee joint, and the feet.
HIPS:
The hips are probably the most sturdy component of the design due to the large amount of wood I had to use. The main function of the hips is to connect the shaft of the legs to the abdomen and must allow rotation along two axis' in two different locations, hence the large amount of wood used. To allow rotation of the tubes inside the body of the hips I used a simple design like that shown below:
The final product was wrapped in a layer of foam, not because I was worried about the robot getting damaged, but anything else that happened to bump into it (the edges were sharp).
LEG SHAFT:
The main portion of the leg and consisting of the knee joint. I used PVC pipes for the legs and a simple door hinge for the knee joint. The pipe was cut in half (near where the knee would be) and the hinge was screwed into both sections of the pipe, effectively joining them together. The basic design is shown below:
I added a layer of foam in between the connection of the two pipes (at the knee joint) so that when it opened/closed it wouldn't make a *snapping* sound or damage the pipes. The finished product is seen here.
Feet:
The feet were constructed out of wood. I had to design something that looked slightly foot-like yet also connected to the leg shaft (allowing it to rotate well) solidly enough to support the rest of the body. Furthermore the feet had to have enough contact surface area (and in the right places) so that the body would not just fall down all the time. The final design is somewhat crude but it satisfied all the above criteria to my satisfaction. Here they are.
Completed Legs:
Here are all the leg components connected (hips, leg shaft, feet).
The Final Product:
So it turned out that I could only complete the lower half of my robot that summer (this is due to various reasons, number 1 being that I ran out of wood, glue, and money to buy more of just that). However I believe that the lower half was the more interesting and challenging half to build. When I first completed the project I was quite happy with myself (its a robot!) however now that I look at it years later I cant help but notice the lack of FUNCTION. However it was still a useful project because it helped me understand the mechanics of the lower half of a biped (distribution of weight, joints, the works). Furthermore I now have a greater appreciation for glue, wood, PVC pipes and an imagination lacking money. Don't give up just because you cant afford all the electronic "jazz" (motors, sensors, circuits) work with what you have and see where it takes you. I now present the final form of my Robot Android version 1.0 (standing, sitting and rockin all by itself).
So, with the materials listed and a hefty supply of super strength wood glue I constructed what you see below, my robot android (version 1.0).
Structural Components:
Abdomen:
The core of the lower half of the robot. This piece joins the legs to the rest of the body and has to allow the legs to remain solid and stable while being able to rotate. Futhermore it has to be able to withstand the most force due to its position in the body.
I was aiming to imitate a rough shape of the human abdomen, hence I avoided the perfect square at ALL COSTS. However, cutting wood accurately with a hand saw (and making replica's for two sides) is quite hard and so I ended up producing something more angular than what I wanted, but it worked nicely as you can see. All the wood pieces were attached with wood glue. In total the abdomen consists of 4 major wooden sections.
To connect the abdomen to the two legs I used PVC pipes. Attaching these pipes so that they were 100% secured to my liking was difficult. I ended up making two holes in the sides of the abdomen (the wooden sheets), sliding the PVC pipe through and gluing some AOL CD's (good for anything but installing on your computer) to them, finally I added an extra layer of wood around the pipe on the external sides. This produced such a secure connection that I was thoroughly impressed and I recommend this technique to anyone in need of a quick fix and in a similar situation.
LEGS:
The leg design is broken into 3 main components. The hips or thighs that connects the legs to the abdomen, the leg shafts consisting of the knee joint, and the feet.
HIPS:
The hips are probably the most sturdy component of the design due to the large amount of wood I had to use. The main function of the hips is to connect the shaft of the legs to the abdomen and must allow rotation along two axis' in two different locations, hence the large amount of wood used. To allow rotation of the tubes inside the body of the hips I used a simple design like that shown below:
The final product was wrapped in a layer of foam, not because I was worried about the robot getting damaged, but anything else that happened to bump into it (the edges were sharp).
LEG SHAFT:
The main portion of the leg and consisting of the knee joint. I used PVC pipes for the legs and a simple door hinge for the knee joint. The pipe was cut in half (near where the knee would be) and the hinge was screwed into both sections of the pipe, effectively joining them together. The basic design is shown below:
I added a layer of foam in between the connection of the two pipes (at the knee joint) so that when it opened/closed it wouldn't make a *snapping* sound or damage the pipes. The finished product is seen here.
Feet:
The feet were constructed out of wood. I had to design something that looked slightly foot-like yet also connected to the leg shaft (allowing it to rotate well) solidly enough to support the rest of the body. Furthermore the feet had to have enough contact surface area (and in the right places) so that the body would not just fall down all the time. The final design is somewhat crude but it satisfied all the above criteria to my satisfaction. Here they are.
Completed Legs:
Here are all the leg components connected (hips, leg shaft, feet).
The Final Product:
So it turned out that I could only complete the lower half of my robot that summer (this is due to various reasons, number 1 being that I ran out of wood, glue, and money to buy more of just that). However I believe that the lower half was the more interesting and challenging half to build. When I first completed the project I was quite happy with myself (its a robot!) however now that I look at it years later I cant help but notice the lack of FUNCTION. However it was still a useful project because it helped me understand the mechanics of the lower half of a biped (distribution of weight, joints, the works). Furthermore I now have a greater appreciation for glue, wood, PVC pipes and an imagination lacking money. Don't give up just because you cant afford all the electronic "jazz" (motors, sensors, circuits) work with what you have and see where it takes you. I now present the final form of my Robot Android version 1.0 (standing, sitting and rockin all by itself).
Sunday, May 20, 2007
Electronic vs. Mechanical Scales
So you have this dilemma, you need to weigh something, be it a rocket engine, a spare screw in your next robot project, or the amount of glue you will be applying to your final project (this applies to just about anything) and you need to know the EXACT mass. Here we will be comparing the two options that (most) engineers have in small-scale projects. We have the electronic scale and the mechanical scale, so lets compare these two scales against each other and see what we get.
ELECTRONIC SCALE:
I have in my possession an OHAUS Explorer Pro electronic scale (seen above). This scale is quite large with rough dimensions of 32cm x 21cm x 10cm (length/width/height), requires a 12VAC / 1A output power adapter, and has a maximum measurable mass of 2100g. The scale has a large LCD display with several buttons surrounding it.
Buttons and Functions:
The positioning bubble (yellow) is like that found in the level of a construction worker, there is a small black circle and then fluid and a bubble underneath, to level the scale you must adjust two height adjustment screws at the back of the scale until the bubble is fully inside the circle, then you know the scale is level.
Warning: the scale MUST be leveled before any readings are taken to prevent invalid data.
Turning it on:
When you press the On/Off button (only once) the scale will turn on and initiate the startup sequence, this includes checking internal calibration automatically. When the internal calibration is off, the scale will take a few moments to recalibrate (as shown below).
The scale will calibrate itself and you will hear a series of motor noises, grinds, and clunks. When the recalibration sequence is complete a screen like that shown on the right will appear showing the corrections.
How it Works:
To measure the mass of a specimen (under 2100g) simply place it on the metal pan (after using the O/T button to zero the scale) and read off the output value on the LCD screen.
MECHANICAL SCALE:
I have in my possession an OHAUS Triple Beam Balance mechanical scale (as shown above). This scale is fairly large with rough dimensions 43cm x 10cm x 16cm (length/width/height). The scale is composed of 100% metal (high quality) and has a maximum measurable mass of 2610g.
How it works:
To measure the mass of a specimen, place it on the metal pan. Zero all the weights by moving them completely to the left (zero). Now slide the weights (there are 3) starting from the largest to the smallest in the direction of increasing mass. (note: in the picture the weights are at the maximum setting, corresponding to 2610g).
1. Slide the largest weight from the zero position to the right until the metal arm tilts downwards PAST the white zero marking. Now move the weight ONE position to the left (decreasing mass).
2. Repeat the process for the medium sized weight.
3. Now slide the small weight along until the arm is aligned with the white zero marking. Add up the values from all three weights (their positions) to find the total mass of the specimen.
How They Compare:
Electronic Scale:
Pros:
- Higher Accuracy
- Automatic calibration
- Large LCD screen
- Many extra functions (with buttons)
- Positioning bubble (to level) - Ability to ZERO at any mass
- Does not require any skill/knowledge to use
- able to measure hundredths of a gram
- able to measure in grams or ounces
Cons:
- Price: roughly $4000 CAD
- Requires an electrical outlet
- Quite large and heavy
- Not very durable
Mechanical Scale:
Pros:
- Price: roughly $100 CAD
- Does not require an electrical outlet (can be used anywhere)
- Durable
Cons:
- Lower Accuracy
- Requires skill/knowledge to use
- no other functions
- Manual calibration required
- Only one zero point
To test the difference in accuracy between the two scales I measured a standard Ti-83 calculator using both scales.
Results:
Electronic Scale: 260.00g
Mechanical Scale: 260.6g
This corresponds to a 0.23% error in the mechanical scale reading. As you can see the difference is not all that big. Therefore when spending an extra $3900 CAD to upgrade from the mechanical to electrical scale the major gains are an extra significant figure (hundredths of a gram) extra functions (able to print directly from scale etc.) and the ease of measuring specimens.
Monday, May 14, 2007
SoBe night light
I had built one of these a year ago however the battery connection was broken and I had no way to reconnect it so I ended up just breaking the bottle and building a new one. The circuit is quite simple and the finished product makes a nifty night light.
Parts List:
- 1 SoBe glass bottle or other large glass container
- 1 LED of your color preference (try and buy superbright)
- 2 1000 Ohm resistors
- 1 9 volt battery
- 1 9 volt battery connector
- 1 NPN transistor (2N 4401)
- 1 Photo-Cell
Unfortunately my setup includes a normal LED and not a superbright one so my max light emission is very small. To produce more light I suggest using a superbright LED of any color and try playing with the resistor resistance values, I found this setup to produce the maximum amount of light for me.
heres a video of it in action!
SoBe night light video
and if you want to check out the site where I got all the info for this project (basically my template/helper site) you can check it out here:
hacked gadgets Blue Bawls automatic light
they have a bunch of cool videos, schematics and photos so check it out!
Subscribe to:
Posts (Atom)